Case The Designer Connie Babbert!

Welcome to our Saturday Blog Hop at Create With Stamping Friends. This is our last week featuring Case The Designer and this week we all chose a project from Connie Babbert to case:
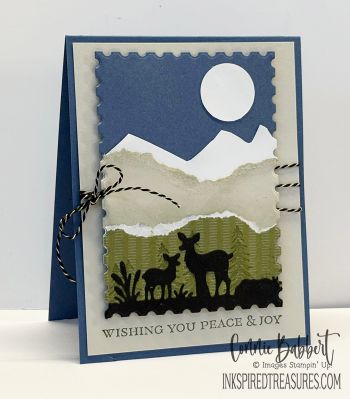
This is Connie’s card above that I chose to case from her blog, and this is my card using the layout and the same colors:

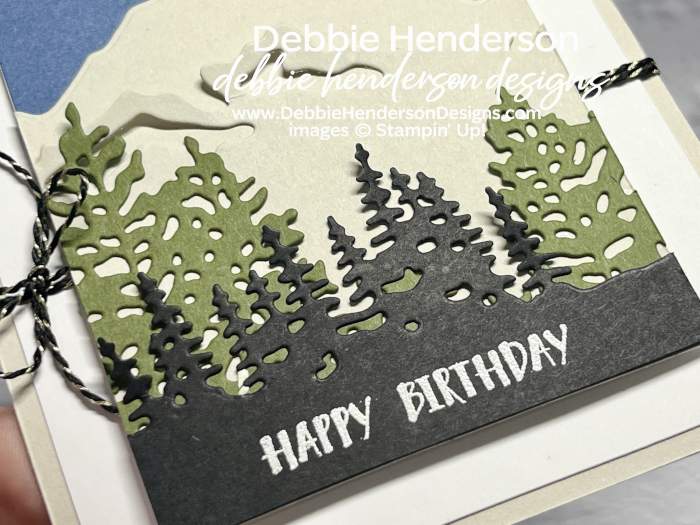
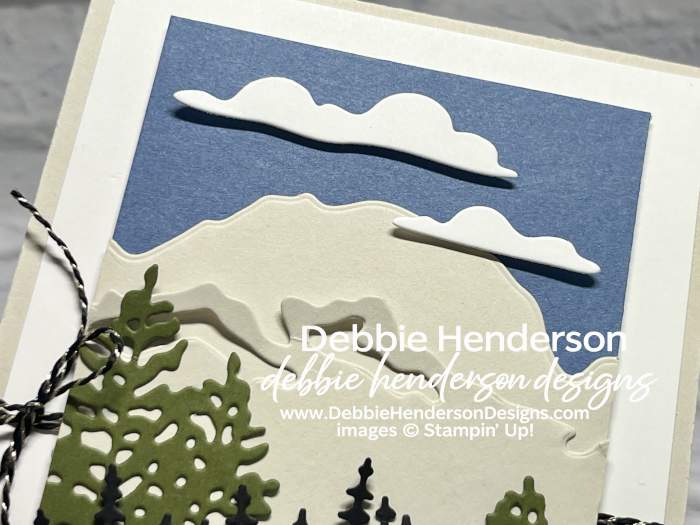
The Light & Wonder Dies (newly retired) that I used were perfect to cut out all of my layers using different cardstock colors. You can see the beautiful details from all of the dies that I used:
Stampin’ Up! Products Used:
- Stamps: The Right Words
- Inks: VersaMark
- Cardstock: Basic Black, Basic White, Basic Beige, Misty Moonlight, Mossy Meadow
- Tools & Accessories: Light & Wonder Dies, Black & White & Gold Bakers Twine, Heat Tool, Basics Embossing Powders, Stampin’ Dimensionals
Card Recipe:
- Card Base: Basic Beige Cardstock 11 x 4-1/4. Score and fold at 5-1/2.
- Layer 2: Basic White Cardstock 5-1/4 x 4. Glue to card base.
- Twine: Wrap the twine around the card base front twice, and tie into a bow at the left.
- Layer 3: Misty Moonlight Cardstock 4-1/2 x 3-1/4. Set aside.
- Diecut Layers: Add the following diecut layers to the Misty Moonlight Cardstock layer as follows:
- Cut the 2 mountain layers with Basic Beige Cardstock 3-1/4 x 2. Glue and layer to resemble two mountain layers.
- Cut the larger trees with the die and Mossy Meadow Cardstock 3-1/4 x 2-3/4. Glue below the mountains.
- Cut the smaller trees with the die and Basic Black Cardstock 3-1/4 x 2. Stamp the sentiment with VersaMark Ink at the bottom. Sprinkle with white embossing powder and melt with the Heat Tool. Glue even at the bottom.
- Cut clouds with the 2 dies and Basic White Cardstock. Glue above the mountains with Stampin’ Dimensionals.
- Glue cardstock layer to card front with Stampin’ Dimensionals.
Now you can follow the rest of the Saturday Blog Hop by clicking on the links below to visit my talented teammates! Click BACK to visit the Create With Stamping Friends Blog and NEXT to visit Lori de Groot:


Check out our newest tutorial Collection at Create With Stamping Friends:


Leave a Reply