• Skip to secondary menu
  • Skip to main content
  • Skip to primary sidebar
  • Clearance Rack
  • Product Suites
  • Bundled Savings

Debbie Henderson, Stampin' Up! Demonstrator

Daily papercrafting inspiration, free project sheets, Merry Christmas Card Club, and card kits.

  • Home
  • Events
  • Specials
  • Shop
    • Shop Stampin’ Up! Online
  • Join My Team
    • Sign Up Online!
  • Contact
  • Retired Stampin’ Up! Products For Sale

Create With Stamping Friends Saturday Blog Hop

February 21, 2026 Leave a Comment

Case The Designer Cindy Elam!

Welcome to our Saturday Blog Hop at Create With Stamping Friends and another week of Casing The Designer. Cindy Elam is our team featured designer this week. This is the card I designed using Cindy’s colors and layout:

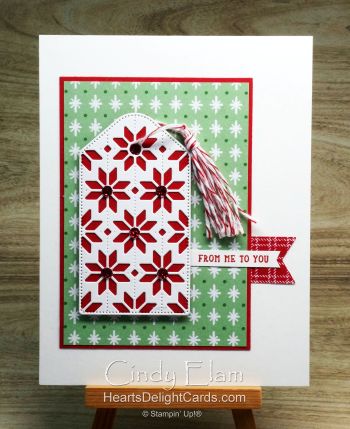
I copied the layout and colors from this project on Cindy’s blog:

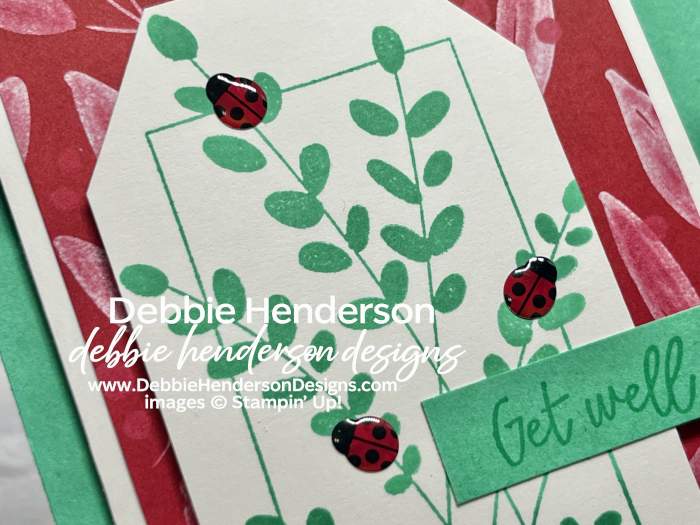
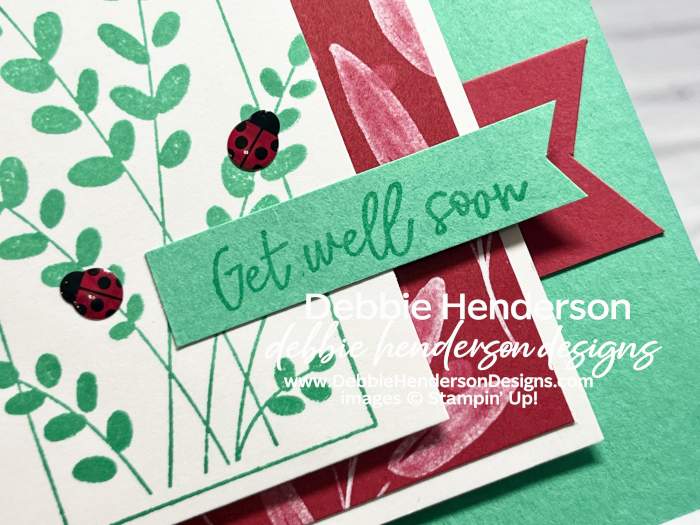
I handcut my own tag and stamped it with a pretty image from the Friendly Foliage Bundle. I also added some ladybugs from the Ladybug Garden Epoxy Shapes to my branches:

Stampin’ Up! Products Used:

  • Stamps: Friendly Foliage
  • Inks: Shy Shamrock
  • Cardstock: Basic White, Real Red, Shy Shamrock
  • Designer Paper: Regals
  • Tools & Accessories: Paper Snips, Stampin’ Dimensionals, Ladybug Garden Epoxy Shapes

Card Recipe:

  • Card Base: Shy Shamrock Cardstock 11 x 4-1/4. Score and fold at 5-1/2.
  • Layer 2: Basic White Cardstock 4-1/2 x 3-1/4. Glue 1/4″ from the left side with Stampin’ Dimensionals.
  • Layer 3: Regals Designer Paper 4-1/4 x 3. Glue to white layer.
  • Layer 4: Tag:
    • Basic White Cardstock 3-1/2 x 2-1/4.
    • Cut the two top corners at an angle for the tag shape with Paper Snips. TIP: Cut 1 corner and use the cut piece as a pattern for the opposite side when flipped over.
    • Stamp the branch image with Shy Shamrock Ink.
    • Add Ladybug Garden Epoxy Shapes to the branches.
    • Glue tag 1/4″ from the left side of the designer paper with Stampin’ Dimensionals.
  • Sentiment: Shy Shamrock 2-1/8 x 1/2. Stamp the sentiment with Shy Shamrock Ink. Cut the right end of the cardstock strip into a banner shape with Paper Snips. Glue to the right side of the tag flat and add 1 Stampin’ Dimensional on the right end.
  • Banner: Real Red Cardstock 1 x 1. Trim one end into a banner shape with Paper Snips. Tuck and glue under the white layer and line up with the sentiment banner.

Now you can follow the rest of the Saturday Blog Hop by clicking on the links below to visit my talented teammates! Click BACK to visit the Create With Stamping Friends Blog and NEXT to visit Lori de Groot:

Check out our newest tutorial Collection at Create With Stamping Friends:

Print Friendly, PDF & Email

Filed Under: CCM Blog Hop

Contact Me!

Reader Interactions

Leave a Reply Cancel reply

Your email address will not be published. Required fields are marked *

Primary Sidebar

Debbie Henderson

Debbie Henderson

Stampin' Up! Demonstrator
Contact Me!

Shop My Online Store
  • Facebook
  • Instagram
  • Pinterest
  • YouTube

My 15 Year Anniversary Stampin’ Up! 2024

My 15 Year Anniversary Stampin’ Up! 2024

Stampin’ Up! Annual Catalog!

Stampin' Up! Annual Catalog

Mini Catalog

Stampin' Up! Mini Catalog

Click here to subscribe to Paper Pumpkin

Click here to subscribe to Paper Pumpkin

Online Exclusives

Online Exclusives

Create With Stamping Friends Latest Tutorial Collection!

Create With Stamping Friends Latest Tutorial Collection!

Check out all of our Create With Stamping Friends Tutorial Collections.

Search My Blog

I am a Designer for Create with Stamping Friends Saturday Blog Hops

I am a Designer for Create with Stamping Friends Saturday Blog Hops

I am a Designer for the Create With Stamping Friends Thursday Challenge Team

2022 Incentive Trip to Norway Achiever!

2021 Incentive Trip Achiever!

2020 Incentive Trip Achiever!

2019 Incentive Trip Achiever!

2018 Incentive Trip Achiever!

2017 Incentive Trip Achiever!

2014 Incentive Trip Achiever!

Archives

Categories

Disclaimer

The content of this site is the sole responsibility and opinions of Debbie Henderson as an Independent Stampin' Up! Demonstrator and the use of its content, classes, services, and/or products offered is not endorsed by Stampin' Up! Stamped images are copyright Stampin' Up!

Images Copyright Stampin' Up! No affiliation with Stampin' Up! is involved or implied. Genesis for Wordpress Hosted by WebsByAmy.