Halloween Glam Theme!

Welcome to our Saturday Blog Hop at Create With Stamping Friends. I have a neat card fold for you this week. A Gate Fold with a Latch on the front:

It’s hard to capture on my photos but I used Wink Of Stella Clear Glitter Brush on the haunted house for my Halloween Glam:
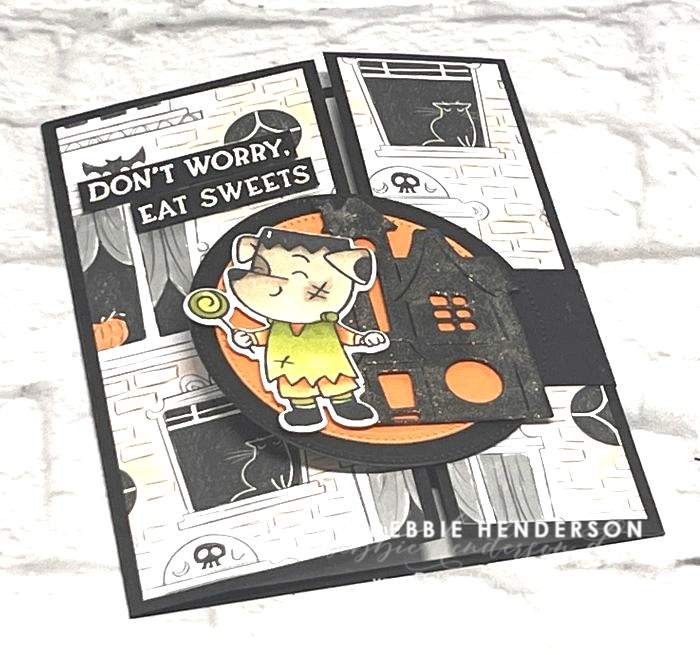

You can see below how the front latch opens and also the two flaps on the front open in opposite directions:


Stampin’ Up! Products Used:
- Stamps: Spooky Halloween
- Inks: VersaMark, Memento Black
- Stampin’ Blends: Crumb Cake, Timid Tiger, Old Olive, Basic Black
- Cardstock: Basic Black, Timid Tiger, Basic White
- Designer Paper: Spooky Sweet
- Tools & Accessories: Spooky Halloween Dies, Stylish Shapes Dies, Wink Of Stella Clear Glitter Brush, Heat Tool, Basics Embossing Powders, Stampin’ Dimensionals
Card Recipe:
- Card Base: Basic Black Cardstock 8-1/2 x 5-1/2. Score at 1-3/4 & 6.
- Inside Layer: Basic White Cardstock 5-1/4 x 4. Glue to inside.
- Latch Strip: Basic Black Cardstock 3 x1-1/4. Score at 1/2″ on one end and fold. Glue the 1/2″ section even with the front right flap on the edge about 2-3/4 from the top.
- Layer 2: Spooky Sweet Designer Paper 5-1/4 x 2-1/4 and 5-1/4 x 1-1/2. Glue to both front flaps.
- Latch Circle Layer 1: Basic Black Cardstock cut with the 3″ circle from Stylish Shapes Dies. Glue to the latch strip on the front when folded.
- Layer Circle Layer 3: Timid Tiger Cardstock cut with the 2-5/8″ circle from Stylish Shapes Dies. Glue to black circle.
- Haunted House: Cut 1 with Basic Black Cardstock and the die. Color with Wink Of Stella. Glue to the right on the timid tiger circle with Stampin’ Dimensionals.
- Critter: Stamp the critter on Basic White Cardstock with Memento Black Ink. Color with Stampin’ Blends. Cut with the die and glue to the left of the haunted house with Stampin’ Dimensionals.
- Sentiment: Stamp the sentiment with VersaMark Ink on a 1/2″ strip of Basic Black Cardstock. Sprinkle with white embossing powder and melt with the Heat Tool. Cut sentiment into two lines and glue to the left flap at the top with Stampin’ Dimensionals.
Now you can follow the rest of the Saturday Blog Hop by clicking on the links below to visit my talented teammates! Click BACK to visit the Create With Stamping Friends Blog and NEXT to visit Lori de Groot:


Check out our newest tutorial Collection at Create With Stamping Friends:


YES§ iT’S ALWAYS WORTH TO WAIT!!!!! Thank you Lord for all you do for us!!!! AMEN