Sprigs & Twigs!

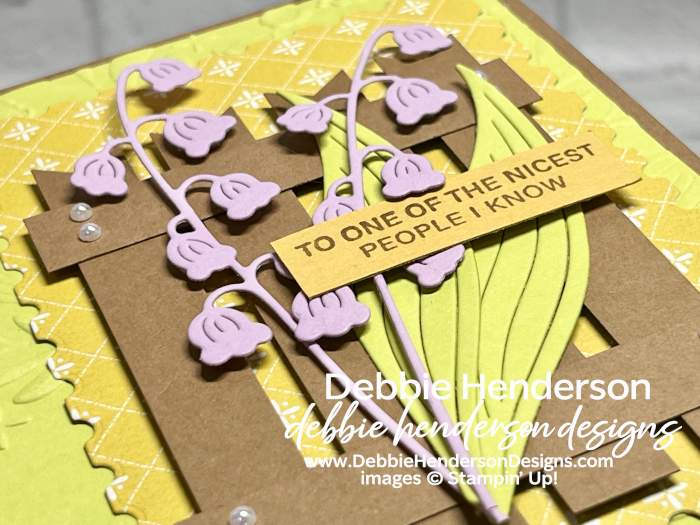
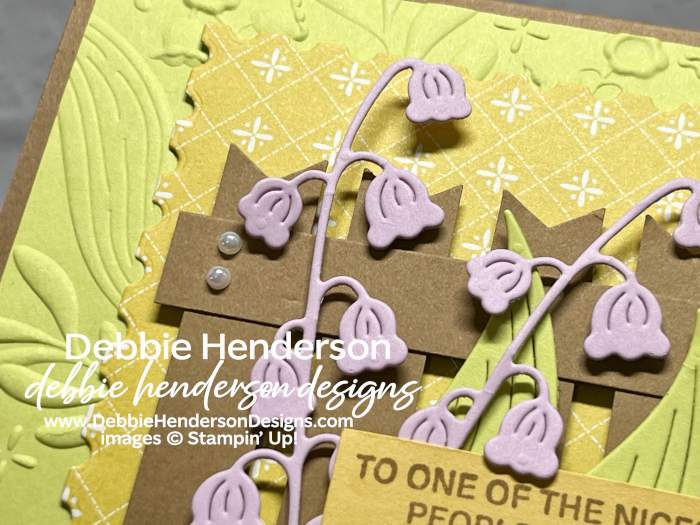
Welcome to our Saturday Blog Hop at Create With Stamping Friends. Sprigs & Twigs is our theme this week and I used the sprigs from our Lily Of The Valley Bundle sitting in front of a homemade fence:

It was easy to create my fence using the Three Banner Punch and I’ll explain how below. The lily sprigs were cut with the die and Fresh Freesia Cardstock. I cut 2 with the die and placed them in front of the fence:
Stampin’ Up! Products Used:
- Stamps: Lily Of The Valley
- Inks: Pecan Pie
- Cardstock: Pecan Pie, Lemon Lime Twist, Fresh Freesia, Golden Glow
- Designer Paper: Valley In Bloom
- Tools & Accessories: Lily Of The Valley, Floral Spray 3D Embossing Folder, Three Banner Punch, Perennial Postage Dies, Iridescent Pearls, Stampin’ Dimensionals
Card Recipe:
- Card Base: Pecan Pie Cardstock 11 x 4-1/4. Score and fold at 5-1/2.
- Layer 2: Lemon Lime Twist Cardstock 5-1/4 x 4. Emboss with the Floral Spray Embossing Folder. Glue to card base.
- Layer 3: Valley In Bloom Designer Paper cut with the 4-1/2 x 3-1/4 die from the Perennial Postage Dies. Glue 1/2″ from the right edge.
- Fence: Follow these steps:
- Pecan Pie Cardstock 2-7/8 x 1/2. Cut 2 and set aside.
- Pecan Pie Cardstock 3-3/4 x 1/2. Cut 4. Slide one end into the back of the Three Banners Punch as shown below and cut one end.
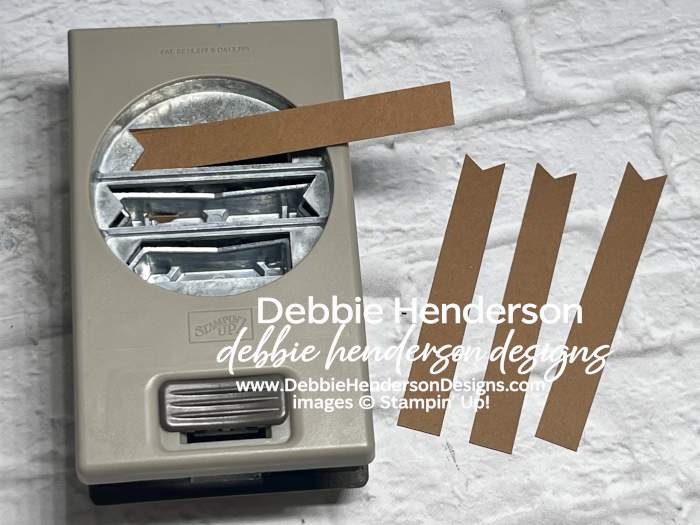
- Create the fence by position all four banner cut pieces with the banner end at the top and about 1/4″ spacing between each one. Glue the 2 shorter sections 1/2″ from the top and 1/4″ from the bottom. Glue fence to card front over the designer paper with Stampin’ Dimensionals.
- Leaves: Cut 2 leaves with the die and Lemon Lime Twist Cardstock. Glue to the right side of the fence flat.
- Flowers: Use the lily sprig die to cut 2 with Fresh Freesia Cardstock. Glue to the left of the leaves over the fence flat.
- Sentiment: Stamp the sentiment on Golden Glow Cardstock 1-3/4 x 1/2 with Pecan Pie Ink. Glue over the leaves and flowers with Stampin’ Dimensionals.
- Bling: Add Iridescent Pearls to the fence, 2 on each end of the shorter sections to resemble nails.
Now you can follow the rest of the Saturday Blog Hop by clicking on the links below to visit my talented teammates! Click BACK to visit the Create With Stamping Friends Blog and NEXT to visit Lori de Groot:


Check out our newest tutorial Collection at Create With Stamping Friends:


Leave a Reply