Sketch Challenge Week With Window Sheets!

It’s Thursday Challenge time at Create With Stamping Friends and this week is all about this sketch challenge for all of us:
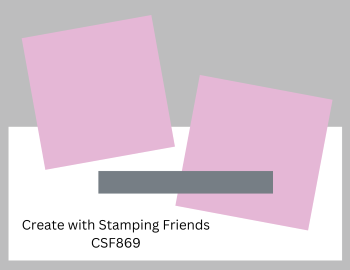
I haven’t used our Window Sheets as a card base for a long time and that’s exactly what I did this week. I cut the Window Sheet to measure 8-1/2 x 5-1/2, score repeatedly a few times to get a good score line in the center at 4-1/4 and gently used my Bone Folder to press the scored line in the folded position. You can also use a piece of copy paper to cover over the fold line so you don’t scratch the window sheet as you press down with your bone folder:

What is also neat about my first layer is that I used designer paper that measures 5 x 3-3/4 and I cut across and flipped one side over so I ended up with two patterns to layer. The patterns show through the window sheet on the front and also on the inside of the card.
One tip I used so that the adhesive stays hidden through the window sheet on the front, is to plan your card ahead of time and add adhesive to the front where the layers will hide the adhesive. Example: I added adhesive to the designer paper before I glued it down, where my square layers would be placed.
Stampin’ Up! Products Used:
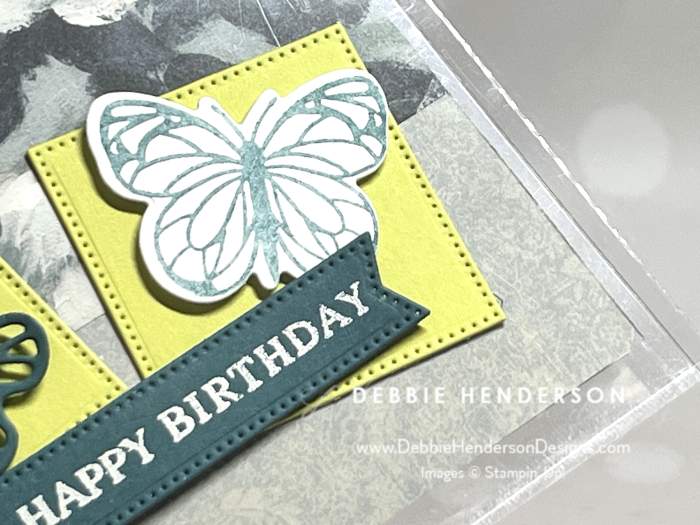
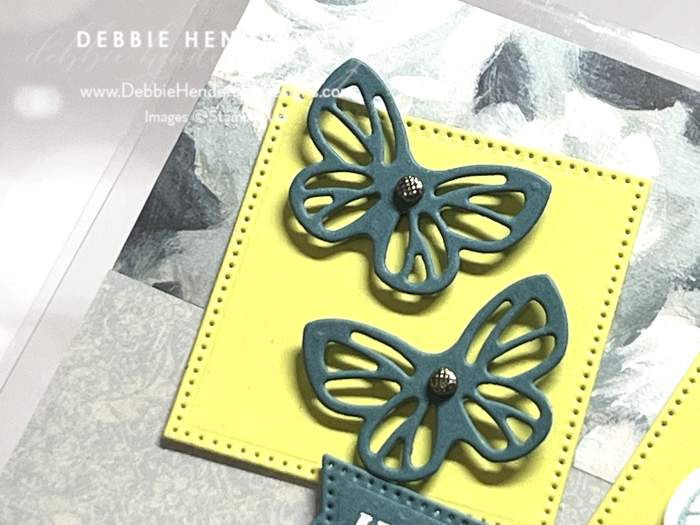
- Stamps: Beautiful Butterflies
- Cardstock: Lemon Lime Twist, Pretty Peacock, Basic White
- Designer Paper: Beautiful Gallery
- Inks: VersaMark, Pretty Peacock
- Tools & Accessories: Beautiful Butterflies Dies, Stylish Shapes Dies, Adhesive-Backed Textured Dots, Window Sheets, Heat Tool, Basics Embossing Powders, Stampin’ Dimensionals, Mini Stampin’ Dimensionals, Tear & Tape
Card Recipe:
- Card Base: Window Sheet 8-1/2 x 5-1/2. Score and fold at 4-1/4.
- Layer 2: Beautiful Gallery Designer Paper 5 x 3-3/4. Cut at 2″ on the short side. Add Tear & Tape where you will be adding layers over the designer paper so the adhesive doesn’t show through the window sheet. Glue to the inside of the window sheet so you can see the patterns peeking through the front.
- Inside & Back Layers: Basic White Cardstock, cut (2) 5 x 3-3/4. Glue to the inside and backside of the window sheet.
- Layer 3: Lemon Lime Twist Cardstock, cut (2) with the Stylish Shapes Dies square that measures 2 x 2. Glue each square at an angle to the window sheet flat.
- Stamped Butterfly: Stamp one butterfly on Basic White Cardstock with Pretty Peacock Ink stamped on scrap paper first for a lighter color without reinking. Cut with the die and glue to the square on the right with Stampin’ Dimensionals.
- Diecut Butterflies: Cut (2) small butterflies with the die and Pretty Peacock Cardstock. Glue to the square on the left with Mini Stampin’ Dimensionals.
- Banner: Stamp the sentiment on Pretty Peacock Cardstock with VersaMark Ink. Sprinkle white embossing powder and melt with the Heat Tool. Cut with the banner die from Stylish Shapes Dies. Glue below the butterflies with Stampin’ Dimensionals.
- Bling: Add Adhesive-Backed Textured Dots to the two diecut butterflies.
Check out what the rest of our team is up to this week by visiting Create With Stamping Friends and while visiting, check out our newest tutorial Collection:


Leave a Reply