Gliding Garden Swing Bundle!

Welcome to our Create With Stamping Friends Inspiration Monday challenges. This week’s inspiration challenge photo is such a beauty. I can see myself sitting in this gliding swing surrounded by pretty flowers:

And this is the card I came up with:
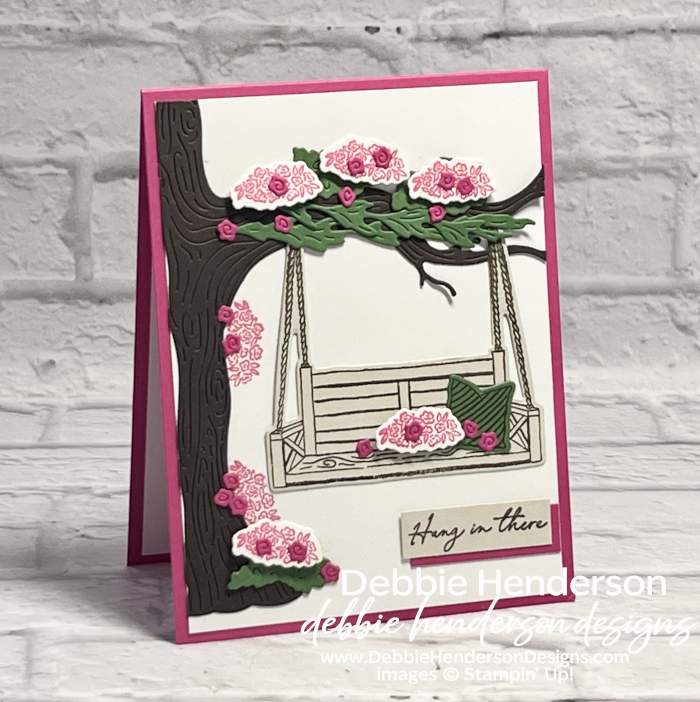
The Gliding Garden Swing Bundle has so many stamp images and diecuts that I just kept adding layer upon layer to create this beautiful outdoor scenery.
Stampin’ Up! Products Used:
- Stamps: Gliding Garden Swing
- Inks: Early Espresso, Melon Mambo
- Cardstock: Early Espresso, Melon Mambo, Garden Green, Basic Beige, Basic White
- Tools & Accessories: Gliding Garden Swing Dies, Stampin’ Dimensionals, Paper Snips
Card Recipe:
- Card Base: Melon Mambo Cardstock 11 x 4-1/4. Score and fold at 5-1/2.
- Layer 2: Basic Beige Cardstock 5-1/4 x 4. Glue to card base.
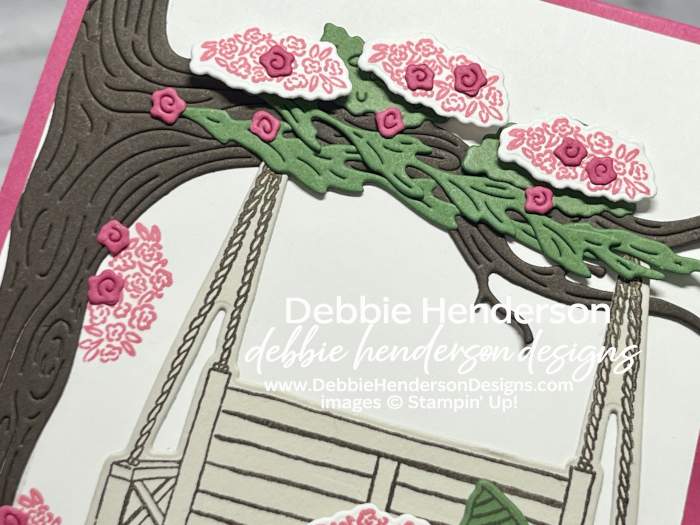
- Tree: Cut one tree with Early Espresso Ink. Cut the length of the tree to measure 5″ and glue to card front. Trim the branch as needed with Paper Snips.
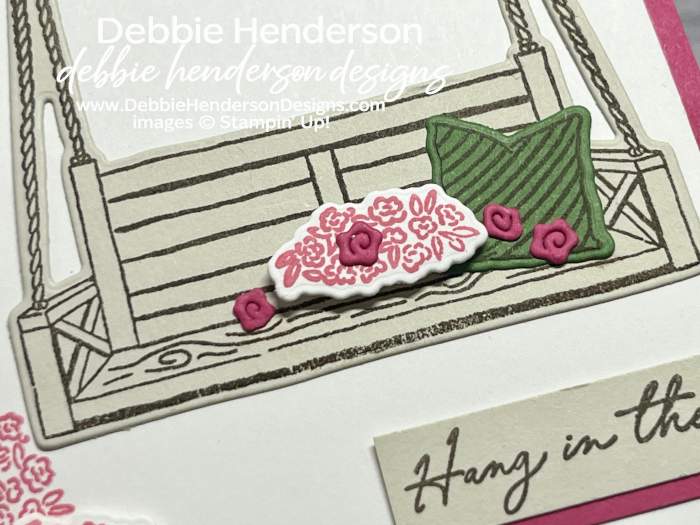
- Swing: Stamp the swing image on Basic Beige Cardstock with Early Espresso Ink. Cut with the die. Glue handing from the tree branch.
- Foliage: With Garden Green Cardstock, cut 2 of the long foliage die and 3 of the small foliage die. Glue the 2 long diecuts over the branch. Glue 2 of the shorter ones about the 2 long ones and 1 at the foot of the tree.
- Stamped Flowers: Stamp the flower cluster image twice along the tree trunk. Stamp 5 more on Basic White Cardstock. Cut with the die. Glue 3 to the top of the tree, one on the swing and one to the bottom of the tree trunk, all with Stampin’ Dimensionals.
- Pillow: Stamp the pillow image on Garden Green Cardstock with Early Espresso Ink. Cut with the die. Tuck and glue under the flowers on the swing flat.
- Roses: Cut a bunch of roses using Melon Mambo Cardstock with the die and glue to the cluster flowers, pillow, swing, tree trunk and foliage.
- Sentiment Layers: Basic Beige and Melon Mambo Cardstocks 1-5/8 x 1/2. Stamp the sentiment on the Basic Beige layer with Early Espresso Ink. Layer the two cardstock pieces together as shown in the phot and glue to the bottom right of the card front.
Make sure you visit Create With Stamping Friends to see what Connie created for our team this week and see our newest tutorial Collection too:


Leave a Reply