Sunset Coast Bundle and Scenic Coast Designer Paper!

Welcome to our Create With Stamping Friends Inspiration Monday challenges. This week’s inspiration challenge is this beautiful lighthouse and colorful sky & water image:

I found the perfect sheet from the Scenic Coast Designer Paper to use. I even stamped some Early Espresso Ink on the left edge of the paper:
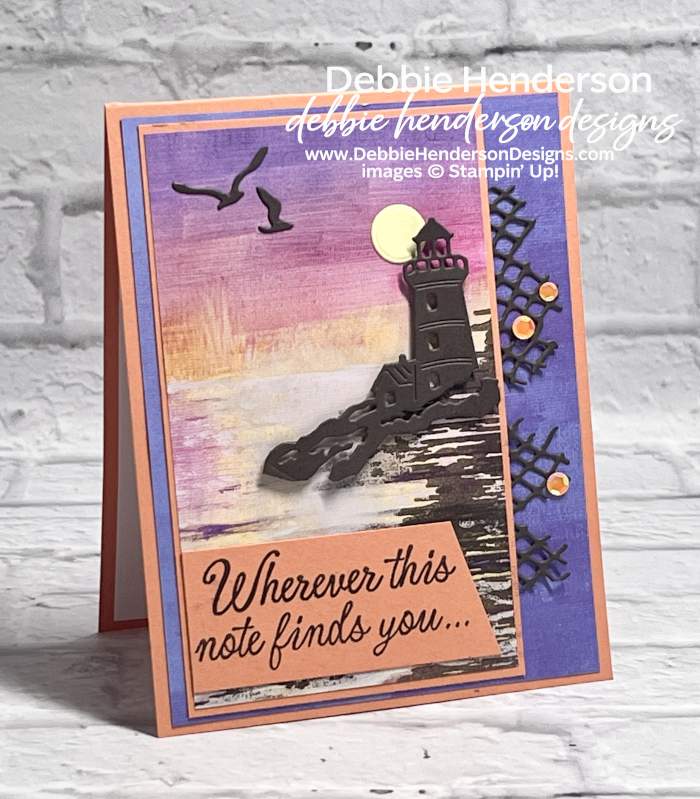
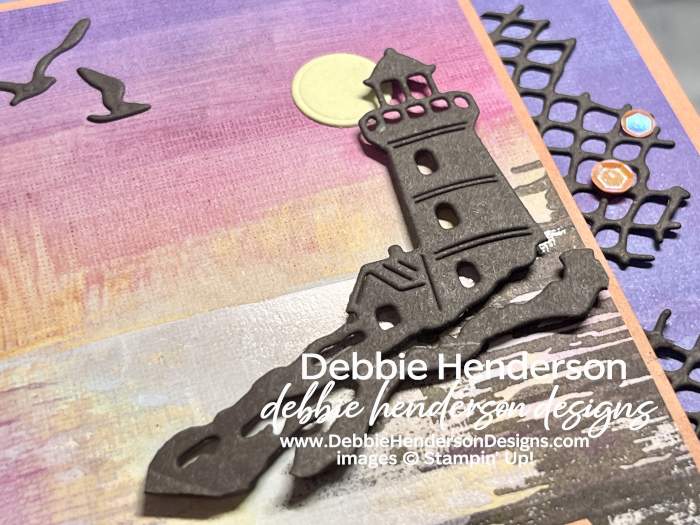
You can see the pretty lighthouse diecut I used along with the sun and a few birds. I love the font and sentiment I used as well:

Stampin’ Up! Products Used:
- Stamps: Sunset Coast
- Inks: Early Espresso
- Cardstock: Timid Tiger, Early Espresso, Lemon Lolly
- Designer Paper: Scenic Coast
- Tools & Accessories: Sunset Coast Dies, Sunset Sparkle Sequins, Stampin’ Dimensionals
Card Recipe:
- Card Base: Timid Tiger Cardstock 11 x 4-1/4. Score and fold at 5-1/2.
- Layer 2: Scenic Coast Designer Paper 5-1/4 x 4. Glue to card base.
- Layer 3: 5-1/8 x 3-1/8. Glue to card front 1/4″ from the left side.
- Layer 4: Scenic Coast Designer Paper 5 x 3. Stamp the border image on the right side starting from the bottom and working your way to about 2/3 of the designer Paper. Glue to card front.
- Layer 5: Use the netting die to cut 2. Gleu to the right on the designer paper layer.
- Layer 6: Timid Tiger Cardstock 2-7/8 x 1-1/4. Stamp the image at the left. Trim the right end at an angle with a paper trimmer. Glue to designer paper layer even on the left side and about 1/4″ from the bottom.
- Lighthouse: Cut the lighthouse with the die and Early Espresso Cardstock. Glue above the sentiment to the right with Stampin’ Dimensionals.
- Sun: Cut with the sun die and Lemon Lolly Cardstock. Tuck and glue flat under the lighthouse at the top left.
- Birds: Use the bird die to cut 2 birds with Early Espresso Cardstock. Glue to the top left of the designer paper flat.
- Bling: Add Sunset Sparkle Sequisn to the netting.
Make sure you visit Create With Stamping Friends to see what Connie created for our team this week and see our newest tutorial Collection too:


Beautiful card. Thanks for sharing 💕