Artistic Leaves & Timeless Plaid Designer Paper!

Welcome to our Create With Stamping Friends Inspiration Monday challenges. This week’s inspiration challenge is this photo full of plaid patterns and colors:

I used the Timeless Plaid Designer Paper and added some handcut leaves from the Artisitic Leaves stamp set:
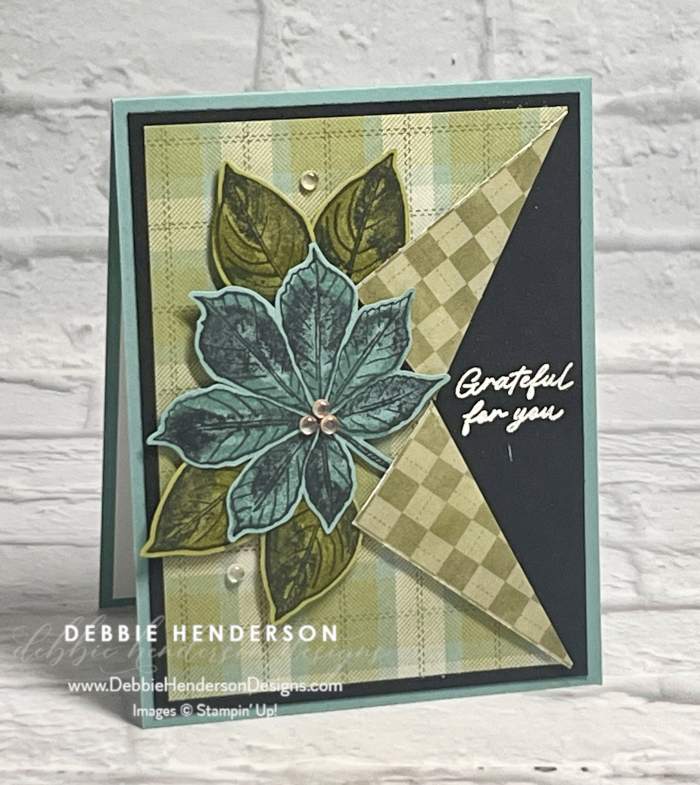
The leaves are all stamped using the 2-step stamping technique as you can see in the details below:


Stampin’ Up! Products Used:
- Stamps: Artistic Leaves
- Inks: VersaMark, Old Olive, Lost Lagoon, Memento Black
- Cardstock: Lost Lagoon, Basic Black, Old Olive
- Designer Paper: Timeless Plaid
- Tools & Accessories: Cherry Cobbler & Pearl Adhesive-Backed Berries, Stampin’ Dimensionals, Heat Tool, Basics Embossing Powders, Paper Snips
Card Recipe:
- Card Base: Lost Lagoon Cardstock 11 x 4-1/4. Score and fold at 5-1/2.
- Layer 2: Basic Black Cardstock 5-1/4 x 4. Glue to card base.
- Layer 3: Timeless Plaid Designer Paper 5 x 3-3/4. Make a horizontal cut on the right edge in the center to about 1-1/4″ long. Fold each cut strip even with the end of the cut and the top corner. Repeat for the bottom corner. Add a Stampin’ Dimensional under each flat and press in place.
- Sentiment: Stamp the sentiment on the Basic Black Cardstock layer in the center with VersaMark Ink. Sprinkle with white embossing powder and melt with the Heat Tool.
- Leaves: Stamp & cut as follows:
- Stamp 1 large leaf on Lost Lagoon Cardstock with Memento Black Ink. Add the detail with the 2nd stamp image and Lost Lagoon Ink.
- Stamp 4 of the small leaf on Old Olive Cardstock with Memento Black Ink. Add the detail with the 2nd stamp image and Old Olive Ink.
- Cut all leaves with Paper Snips.
- Glue the large leaf on the left and centered with Stampin’ Dimensionals.
- Tuck and glue the 4 small leaves with Stampin’ Dimensionals.
- Bling: Add Cherry Cobbler & Pearl Adhesive-Backed Berries to the large leaf and the designer paper background.
Make sure you visit Create With Stamping Friends to see what Connie created for our team this week and see our newest tutorial Collection too:


Leave a Reply