• Skip to secondary menu
  • Skip to main content
  • Skip to primary sidebar
  • Clearance Rack
  • Product Suites
  • Bundled Savings

Debbie Henderson, Stampin' Up! Demonstrator

Daily papercrafting inspiration, free project sheets, Merry Christmas Card Club, and card kits.

  • Home
  • Events
  • Specials
  • Shop
    • Shop Stampin’ Up! Online
  • Join My Team
    • Sign Up Online!
  • Contact
  • Retired Stampin’ Up! Products For Sale

Create With Stamping Friends Challenge 885

September 4, 2025 Leave a Comment

Sketch Challenge Week With The Light & Wonder Bundle!

It’s Thursday Challenge time at Create With Stamping Friends and we have a sketch to use for our project this week:

As a demonstrator, when I first browsed our new Mini Catalog and got to preorder a whole month before customers, the Light & Wonder Bundle was one of the first ones on my list. I love the colors in the Lights Of Aurora Designer Paper. I think that’s what drew me to these products:

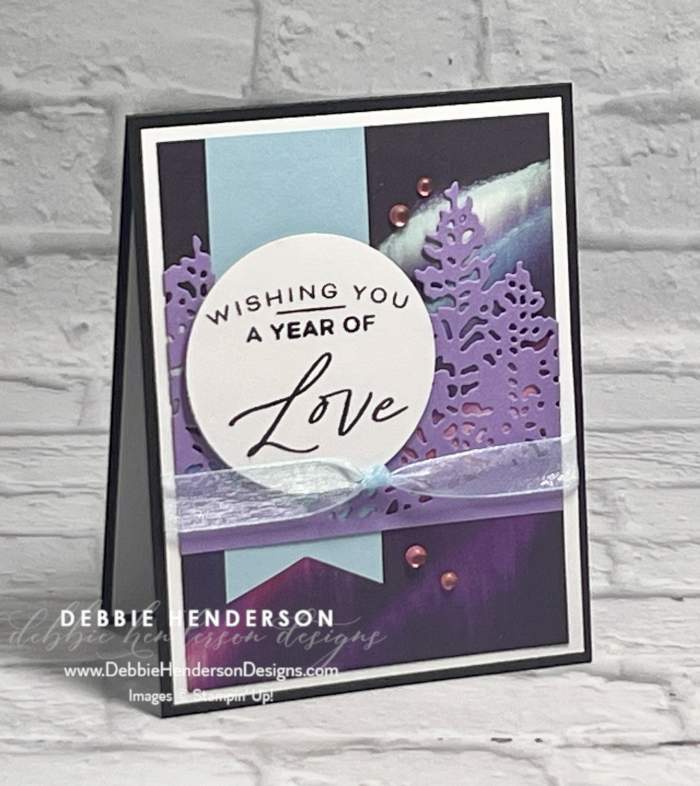
I love the northern lights theme on each designer paper page and once I decided on the print I wanted to use, I added lots of colorful layers to coordinate:

Stampin’ Up! Products Used:

  • Stamps: Light & Wonder
  • Cardstock: Basic Black, Highland Heather, Balmy Blue, Basic White
  • Designer Paper: Lights Of Aurora
  • Inks: Memento Black
  • Tools & Accessories: Light & Wonder Dies, 2-3/8″ Circle Punch, Frosted Iridescent Dots, Balmy Blue Sheer Ribbon, Stampin’ Dimensionals, Paper Snips

Card Recipe:

  • Card Base: Basic Black Cardstock 11 x 4-1/4. Score and fold at 5-1/2.
  • Layer 2: Basic White Cardstock 5-1/4 x 4. Set aside.
  • Layer 3: Lights Of Aurora Designer Paper 5 x 3-3/4. Glue to white layer.
  • Layer 4: Balmy Blue Cardstock 4-1/4 x 1-1/2. Snip one short end into a banner shape with Paper Snips. Glue 3/4″ from the left and even at the top with the designer paper.
  • Layer 5: Highland Heather Cardstock cut with the tree die. Cut to 3-3/4″ wide. Glue about 1-1/2″ from the bottom.
  • Ribbon: Cut a piece of ribbon about 5-1/2″ long and tie a knot in the middle. Glue to card front by adding adhesive to the back of the white layer and wrapping and pressing the ends in place on each side. Glue layer to card base.
  • Sentiment: Stamp the sentiment on Basic White Cardstock with Memento Black Ink. Cut with the 2-3/8″ Circle Punch. Glue to banner with Stampin’ Dimensionals.
  • Bling: Add Frosted Iridenscent Dots to the designer paper background.

Check out what the rest of our team is up to this week by visiting Create With Stamping Friends and while visiting, check out our newest tutorial Collection:

Print Friendly, PDF & Email

Filed Under: Create With Stamping Friends

Contact Me!

Reader Interactions

Leave a Reply Cancel reply

Your email address will not be published. Required fields are marked *

Primary Sidebar

Shop My Online Store
Debbie Henderson

Debbie Henderson

Stampin' Up! Demonstrator
Contact Me!

  • Facebook
  • Instagram
  • Pinterest
  • YouTube

My 15 Year Anniversary Stampin’ Up! 2024

My 15 Year Anniversary Stampin’ Up! 2024

Stampin’ Up! Annual Catalog!

Stampin' Up! Annual Catalog

Mini Catalog

Stampin' Up! Holiday Mini Catalog

Click here to subscribe to Paper Pumpkin

Click here to subscribe to Paper Pumpkin

Scrapbooking Brochure

Stampin' Up! Scrapbook Brochure

Online Exclusives

Online Exclusives

Create With Stamping Friends Latest Tutorial Collection!

Create With Stamping Friends Latest Tutorial Collection!

Check out all of our Create With Stamping Friends Tutorial Collections.

Search My Blog

I am a Designer for Create with Stamping Friends Saturday Blog Hops

I am a Designer for Create with Stamping Friends Saturday Blog Hops

I am a Designer for the Create With Stamping Friends Thursday Challenge Team

I’m a Designer For the Stampers Dozen!

Splitcoast Stampers Guest Designer

2022 Incentive Trip to Norway Achiever!

2021 Incentive Trip Achiever!

2020 Incentive Trip Achiever!

2019 Incentive Trip Achiever!

2018 Incentive Trip Achiever!

2017 Incentive Trip Achiever!

2014 Incentive Trip Achiever!

Archives

Categories

Disclaimer

The content of this site is the sole responsibility and opinions of Debbie Henderson as an Independent Stampin' Up! Demonstrator and the use of its content, classes, services, and/or products offered is not endorsed by Stampin' Up! Stamped images are copyright Stampin' Up!

Images Copyright Stampin' Up! No affiliation with Stampin' Up! is involved or implied. Genesis for Wordpress Hosted by WebsByAmy.